디스코드 봇 DIY - 4. Application Command
내 디스코드 앱과 상호 작용을 하는 기본적인 방법들
이 글에서 다루는 내용
- Application Command 이해하기
- Slash Command 설정하기
- 텍스트 입력이 아닌 Context Menu로 기능 구동하기
Application Command
Application Command는 디스코드 인터페이스에서 앱과 상호 작용을 할 수 있는 정식적인 방법들을 지칭한다. 디스코드에서는 세 가지로 Application Command를 구분 짓고 있다.
Application Command에 대한 자세한 내용은 이곳에서 볼 수 있다.
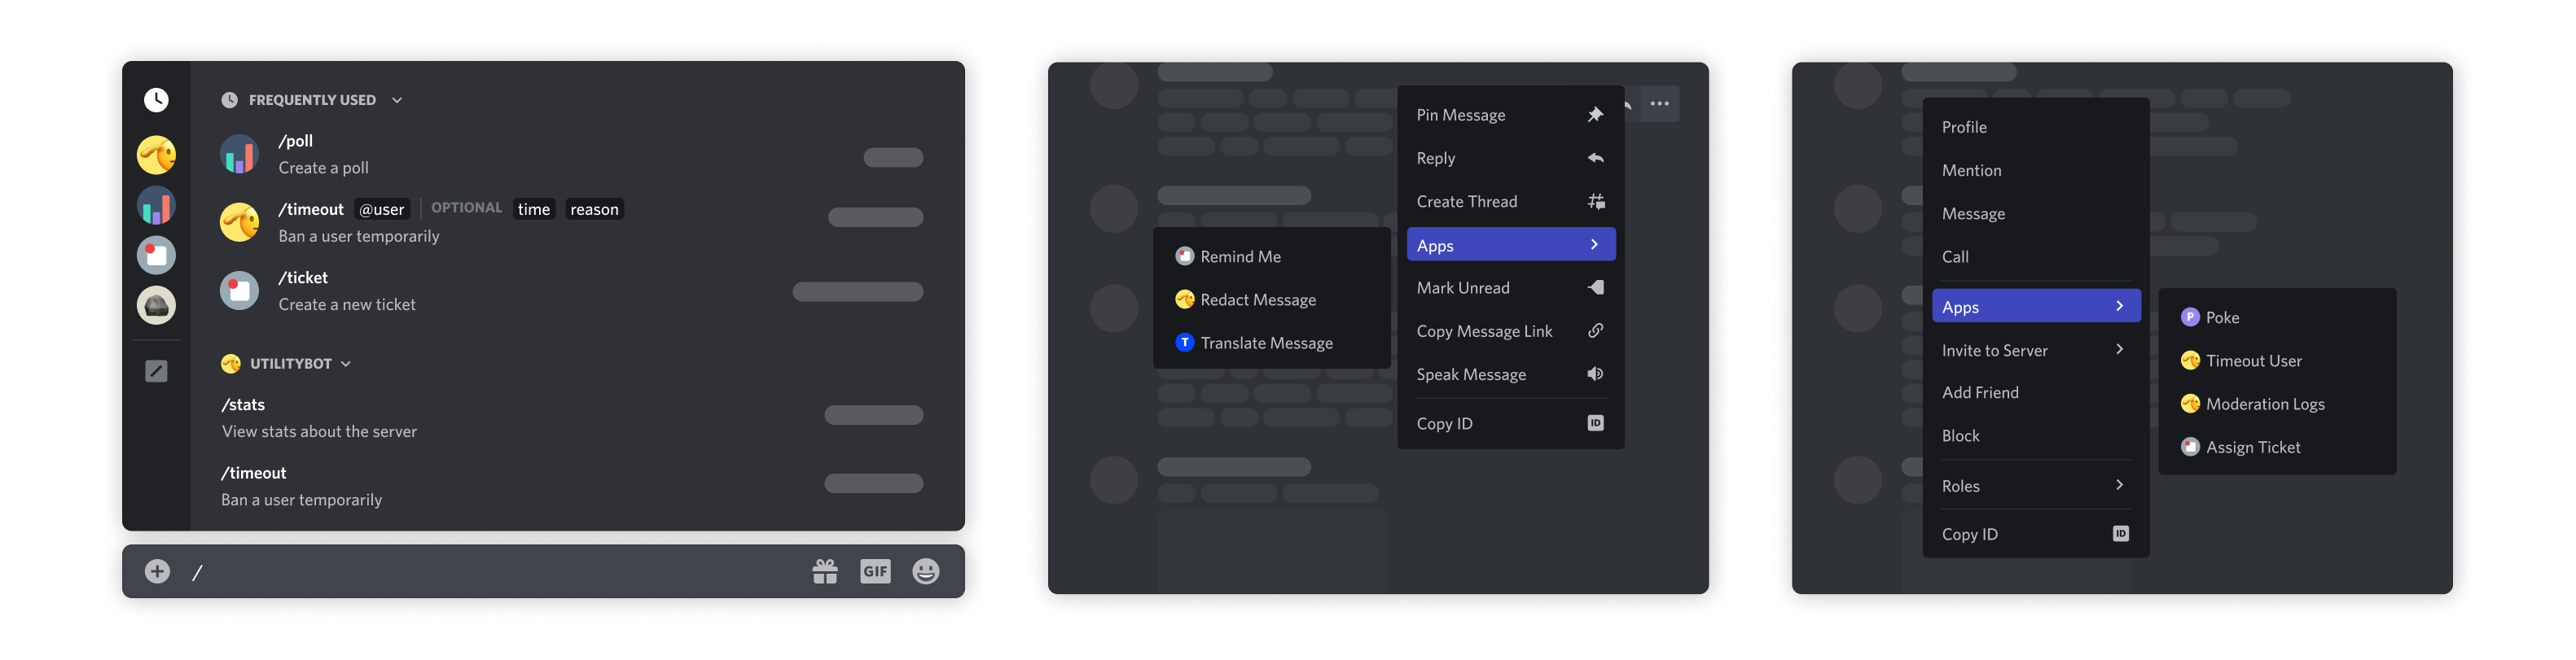
세 종류의 Application Command를 표현한 이미지다. 왼쪽부터 Slash Command, Message Command, 그리고 User Command를 표현했다.
Slash Command
가장 흔히 사용하는 Application Command로, 채팅창에 빗금(/)을 이용해 명령어를 입력하거나 메시지 입력창 왼쪽의 + 버튼을 누르면 나오는 앱 사용으로 명령어를 선택할 수 있다.Message Command
Message Command는 특정 메시지와 관련된 행동을 할 때 유용하다. 원하는 메시지를 우클릭하거나 메시지의 우측 상단 ... 버튼을 누르면 보이는 앱에서 행동을 선택할 수 있다.User Command
User Command는 특정 사용자와 관련된 행동을 할 때 유용하다. Message Command와 비슷하게 원하는 사용자의 아바타나 이름을 우클릭하면 나오는 앱에서 행동을 선택할 수 있다.
앞에서는 discord.ext.commands.Bot의 command_prefix로 본인이 원하는 명령어 인식 기호를 설정해 명령어를 입력하게 했지만, Slash Command를 사용한다면 모든 명령어 인식 기호가 빗금으로 통일된다. 대신에 디스코드 인터페이스에서 자동완성 기능이 지원되고 명령어나 paramter에 관한 설명도 별다른 설정 없이 보여줄 수 있다.
1. 기존 명령어 Slash Command로 바꾸기
일반 명령어를 Application Command로 설정하는 데 중요한 키워드는 tree다. 지금까지는 @bot.command를 썼었지만, 디스코드에서 정식으로 인지하는 Slash Command로 전환하기 위해서는 decorator를 @bot.tree.command로 바꿔야 한다. Bot.tree는 CommandTree의 일종으로 명령어들을 저장하는 저장소 개념이라고 보면 된다. 그래서 @bot.tree.command로 명령어를 생성하면 해당 명령어가 봇의 저장소에 자동으로 저장된다.
1
2
3
4
# 수정 전
@bot.command(name='hello', help="인사를 합니다")
async def hello(ctx):
    await ctx.send("Hello!")
1
2
3
4
# 수정 후
@bot.tree.command(name='hello', description="인사를 합니다")
async def hello(interaction: discord.Interaction):
    await interaction.response.send_message("Hello!")
일전에 만들었던 hello 명령어에 tree를 넣어 Slash Command로 만들었다. 다른 점으로는 help parameter가 description으로 이름이 바뀐다는 점과 ctx 대신 interaction을 받아와 사용한다는 점이 있다.
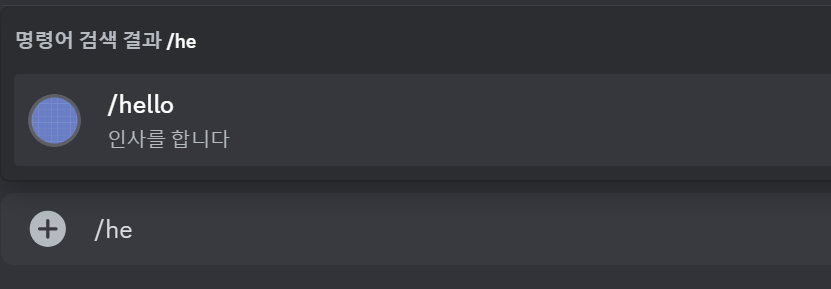
위에 보이는 것처럼 앞 글자만 입력해도 /hello 명령어를 고르는 선택지가 보인다. 이런 식으로 명령어 자동완성이 지원되며 명령어 설명 또한 직관적으로 명령어 아래 적혀있다. Parameter가 설정된 명령어도 Slash Command를 사용하면 더 직관적으로 바뀐다.
1
2
3
4
5
# 수정 전
@bot.command(name='참가일', help="멤버의 서버 참가 날짜를 알려줍니다")
async def joined(ctx, member: discord.Member):
    join_date = member.joined_at.strftime("%Y-%m-%d")
    await ctx.send(f"{member.display_name}님은 {join_date}에 서버에 참가했습니다.")
1
2
3
4
5
6
7
8
# 수정 후
from discord import app_commands # app_commands 불러오기

@bot.tree.command(name='참가일', description="멤버의 서버 참가 날짜를 알려줍니다")
@app_commands.describe(멤버="조회할 멤버")
async def joined(interaction: discord.Interaction, 멤버: discord.Member):
    join_date = 멤버.joined_at.strftime("%Y-%m-%d")
    await interaction.response.send_message(f"{멤버.display_name}님은 {join_date}에 서버에 참가했습니다.")
app_commands 모듈을 불러오면 @app_commands.describe()라는 decorator를 사용할 수 있다. 이 안에서 명령어에서 설정된 parameter에 대한 설명을 추가할 수 있는데, 위에서는 member라는 parameter에 관해 설명을 달아 주었다.
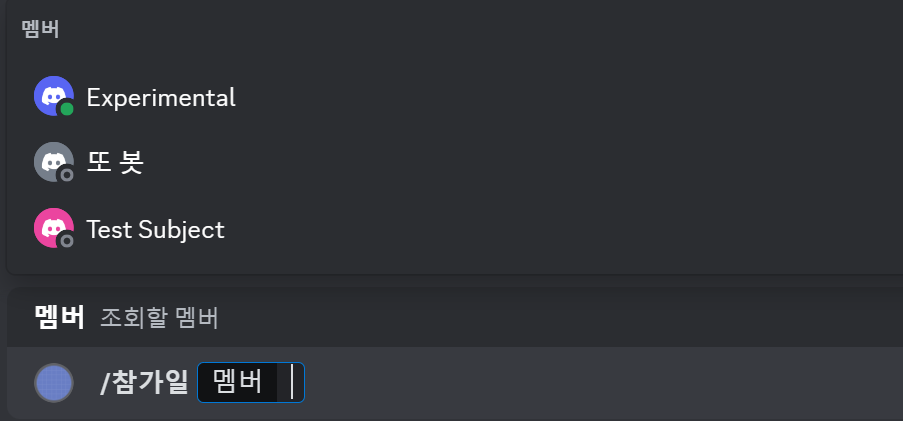
Parameter에 대한 설명을 알려주는 것은 물론이고, discord.Member 객체를 type으로 지정하니 길드에 있는 멤버들 목록을 자동으로 띄워준다. 수정 전에 사용자명을 직접 한 글자씩 입력했던 것과 비교하면 굉장히 편리하다. 더불어 잘못된 값을 넣지 못하게 알아서 exception handling을 해준다.
2. 명령어 Sync 해주기
이제 Slash Command를 활용할 수 있게 되었으니 여러 가지 명령어들을 신나게 추가할 시간이다. 하지만 명령어를 추가했는데 아무리 새로고침을 해도 디스코드 인터페이스에는 명령어가 보이지 않는 것을 확인할 수 있다. 명령어를 따로따로 설정해 둔 이전과 다르게 Application Command들을 모아놓은 CommandTree의 동기화가 이루어지지 않은 것인데, tree의 명령어들은 bot.tree.sync()를 실행해야 디스코드 인터페이스에 동기화가 된다.
1
2
3
@bot.event
async def setup_hook():
    await bot.tree.sync()
setup_hook() 이벤트에 bot.tree.sync()가 발동되게 만들어 놓으면 봇 최초 구동 시에 명령어 변경 사항이 반영된다. 디스코드 인터페이스를 한 번 새로고침(Ctrl + R)하면 변경된 명령어 목록이 보일 것이다.
setup_hook()는 on_ready()와 비슷하면서도 다르다. on_ready()는 클라이언트가 디스코드와 완전한 연결을 생성했을 때 호출되는 이벤트지만, setup_hook()는 클라이언트가 로그인을 했을 때 발동되기에 모든 이벤트 중에 가장 먼저 발동된다. 또한, on_ready()는 연결이 끊겼다가 재생성 될 때 다시 호출될 수 있지만 setup_hook()는 봇 구동 시 1회만 호출된다.

터미널 메시지를 보면 연결이 끊겼다가 재생성 됐을 때 on_ready()가 다시 발동하는 것을 확인할 수 있다. 그러니 최초 1회에 한해 무언가를 하게 시키고 싶다면 on_ready() 대신에 seteup_hook() 이벤트를 활용하자.
봇이 자동으로 tree를 동기화하지 않고 싶지 않다면 이벤트 대신 명령어로 만들어도 된다.
1
2
3
4
5
6
7
8
9
ADMIN = int(os.getenv('ADMIN_ID'))

@bot.command(name="sync")
async def sync(ctx):
    if ctx.author.id == ADMIN:
        await bot.tree.sync()
        await ctx.send("동기화가 완료되었습니다.")
    else:
        await ctx.send("권한이 없습니다.")
일반 사용자가 액세스하지 못하도록 명령어를 입력한 사용자가 .env에서 지정한 관리자인지 확인하게 했고, Slash Command가 아니라 일반 명령어로 설정해서 일반 사용자들에게 보이지 않게 했다. 이러면 봇 구동 시 자동으로 동기화가 이루어지는 것이 아니라 명령어를 입력하여 수동으로 동기화를 진행한다.
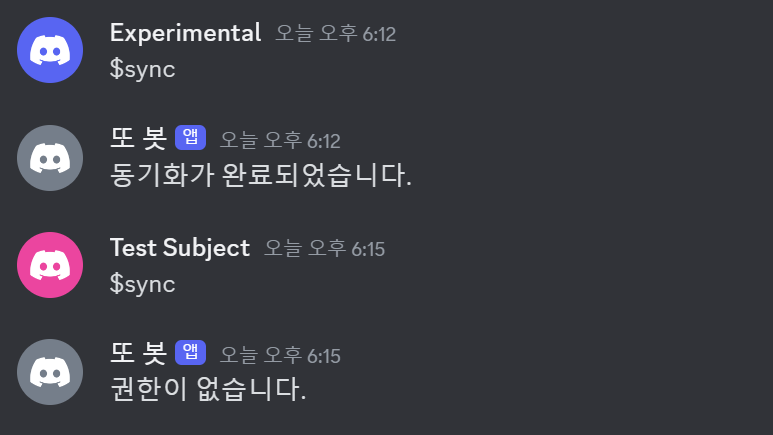
관리자 계정으로 명령어를 입력하니 동기화가 성공적으로 실행되지만, 권한이 없는 사용자는 걸러지는 모습이다. 사용자의 권한 및 길드 내 역할별로 사용할 수 있는 명령어를 설정하는 것은 다음에 더 자세히 다룰 것이다.
3. Context Menu 사용하기
Context Menu는 Message Command와 User Command에서 보이는 기능들을 설정하는 데 사용되는 decorator이다. Slash Command는 @bot.tree.command를 달아 만들었는데, Context Menu는 @bot.tree.context_menu를 사용해 설정한다. 전에 만들었던 서버 참가일을 조회하는 명령어를 응용해 User Command를 먼저 만들어 보겠다.
1
2
3
4
5
6
7
8
9
10
11
12
# Slash Command
@bot.tree.command(name='참가일', description="멤버의 서버 참가 날짜를 알려줍니다")
@app_commands.describe(member="조회할 멤버")
async def joined(interaction: discord.Interaction, member: discord.Member):
    join_date = member.joined_at.strftime("%Y-%m-%d")
    await interaction.response.send_message(f"{member.display_name}님은 {join_date}에 서버에 참가했습니다.")

# User Command
@bot.tree.context_menu(name="참가일", description="멤버의 서버 참가 날짜를 알려줍니다")
async def joined_user_menu(interaction: discord.Interaction, member: discord.Member):
    join_date = member.joined_at.strftime("%Y-%m-%d")
    await interaction.response.send_message(f"{member.display_name}님은 {join_date}에 서버에 참가했습니다.")
Slash Command에서 argument로 조회할 멤버를 입력해야 했던 것과 달리, User Command는 처음부터 특정 사용자를 선택해 실행하는 거라 별도로 입력해 주어야 할 내용은 없다.
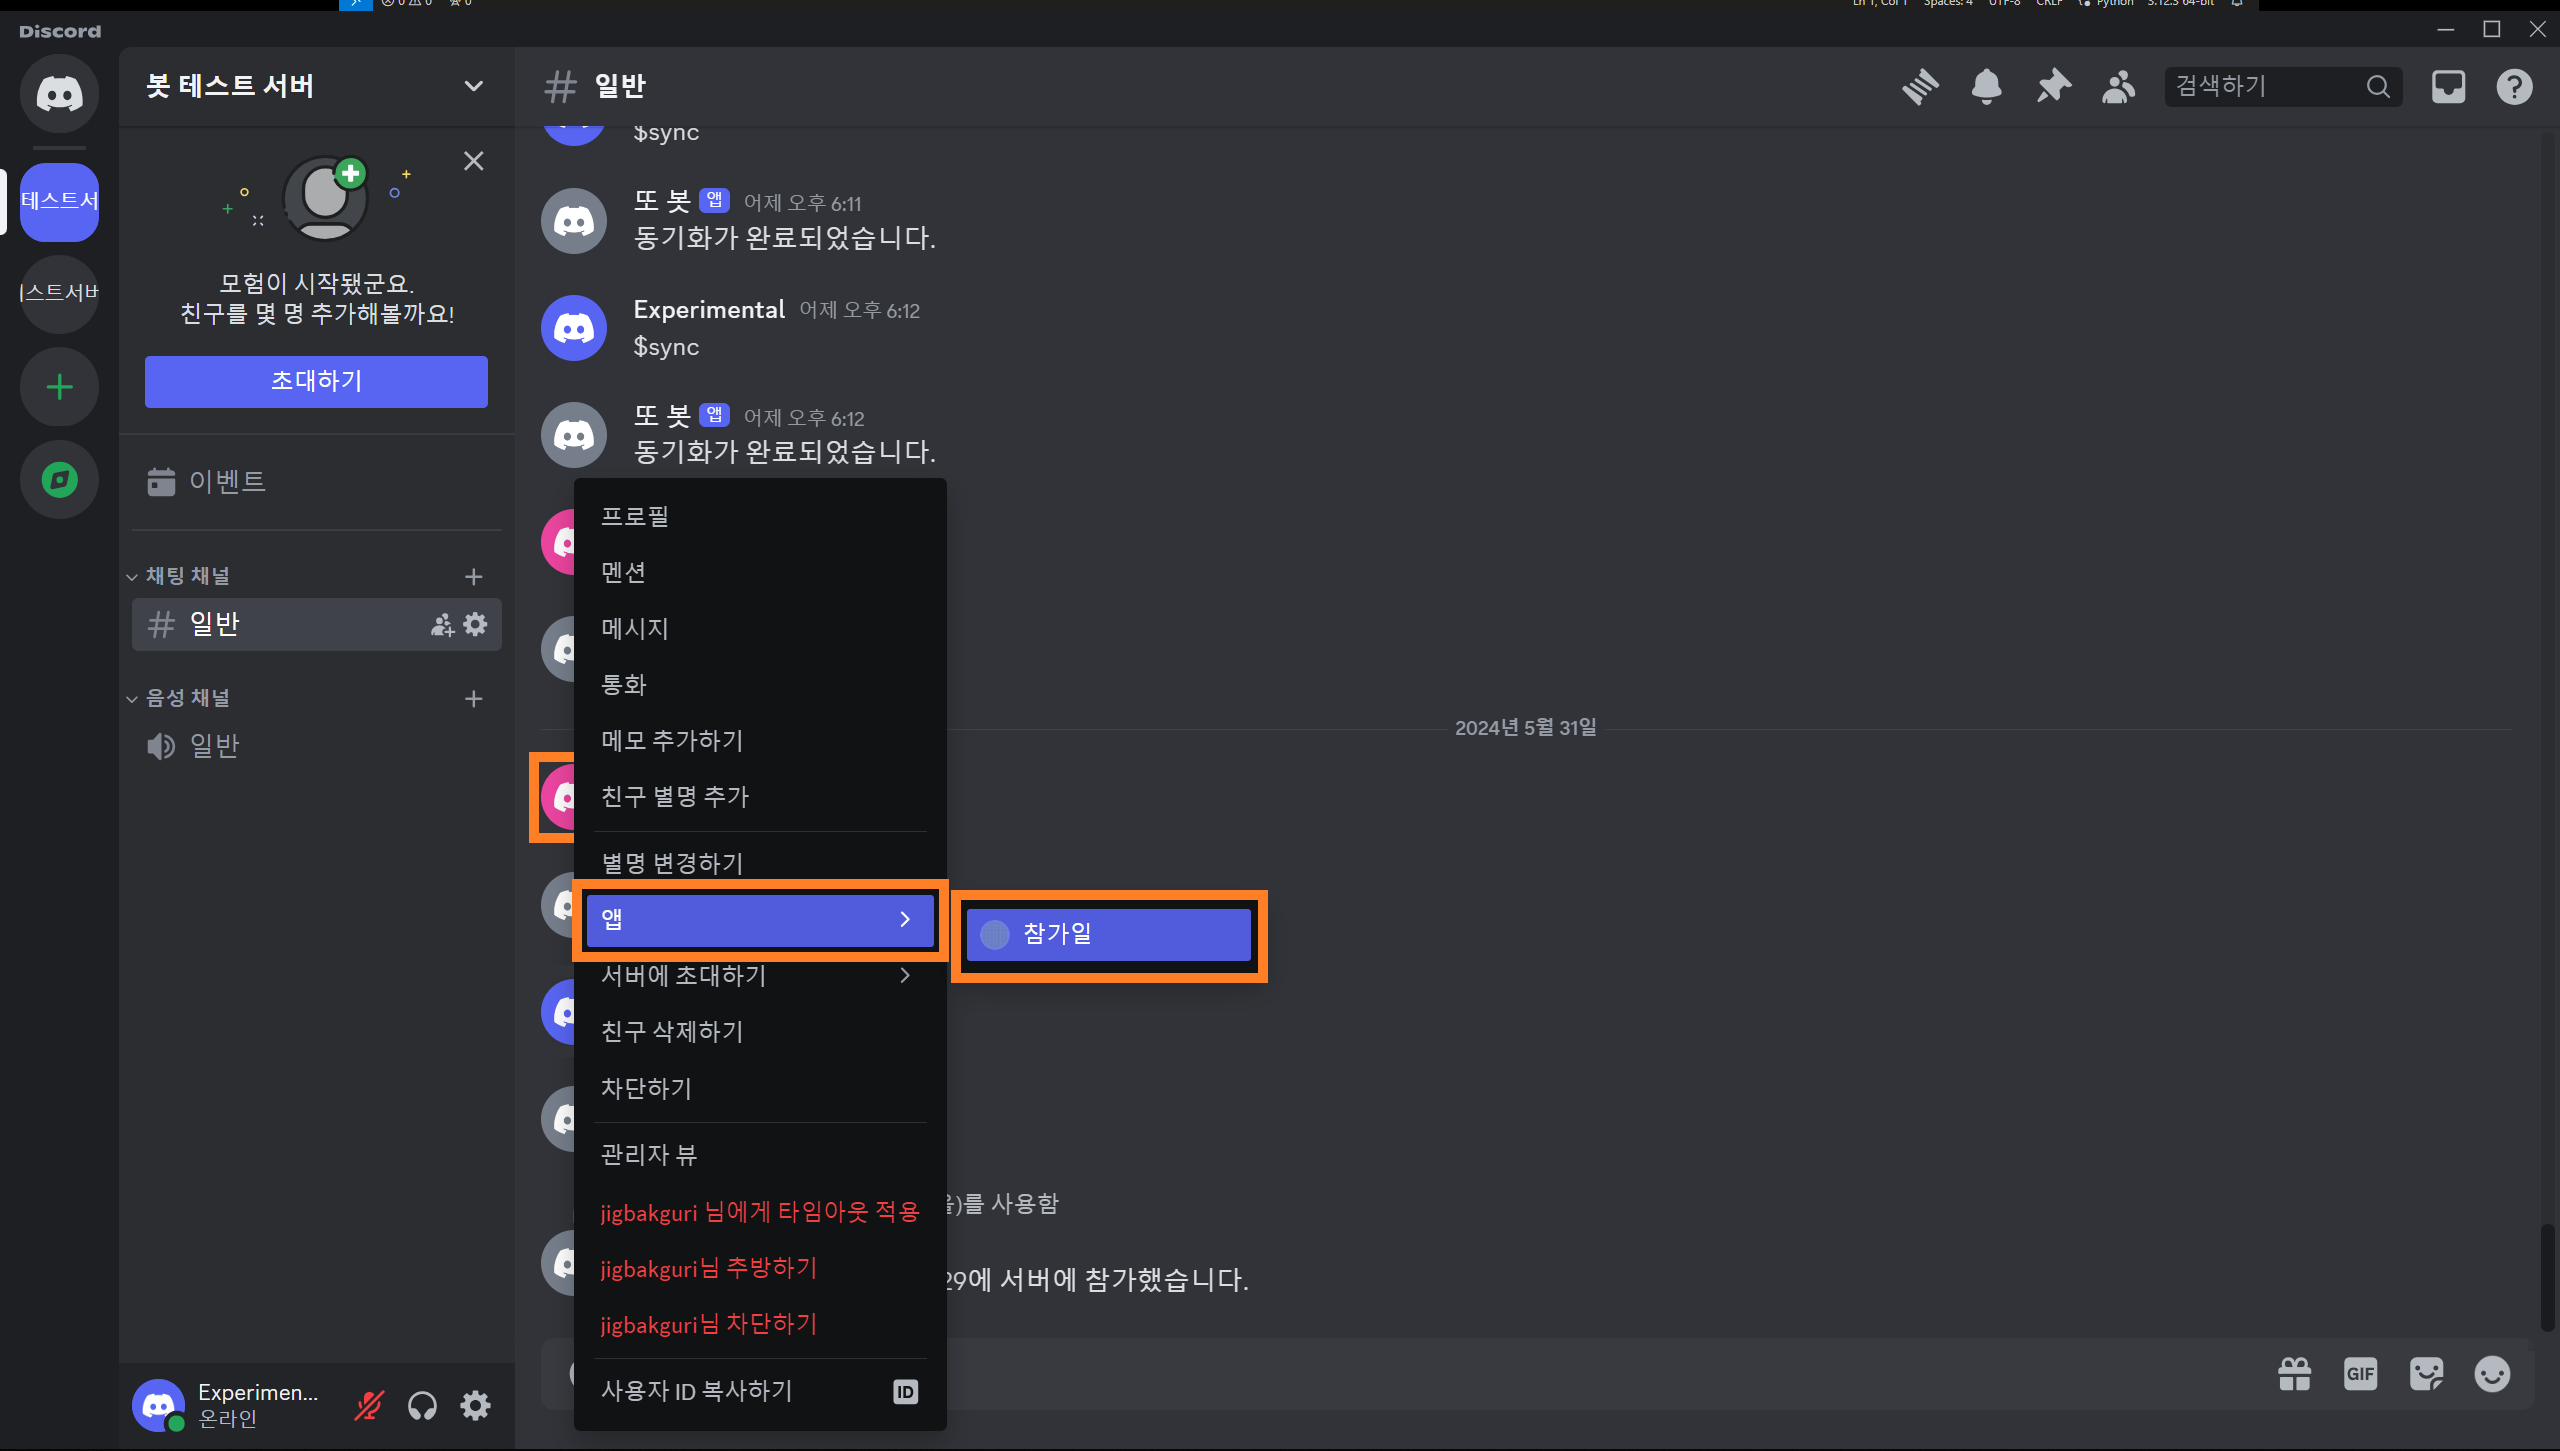
이제 원하는 멤버의 아바타를 우클릭(모바일에서는 아바타 터치)하면 앱 안에 방금 추가한 참가일 기능이 있는 것을 볼 수 있다.

명령어로 하던 것과 똑같게 잘 출력된다. 참가일 조회 Slash Command랑 User Command에 쓴 코드가 일치하지만, 아쉽게도 다수의 Application Command에 하나의 함수를 돌려쓰는 선택지는 없는 듯하다.
마지막으로 Message Command를 만들어 보자. @bot.tree.context_menu를 사용하는 것은 User Command와 동일하지만, parameter에서 discord.Member 대신 discord.Message로 설정해 주어야 한다.
1
2
3
4
5
@bot.tree.context_menu(name="글자수")
async def joined(interaction: discord.Interaction, message: discord.Message):
    characters = len(message.content)
    characters_no_space = len(message.content.replace(' ', ''))
    await interaction.response.send_message(f"공백 포함 {characters}자, 공백 제외 {characters_no_space}자")
간단하게 메시지의 글자 수를 세는 기능을 만들었다. message.content로 메시지의 내용을 가져와 len()으로 글자 수를 확인한다.
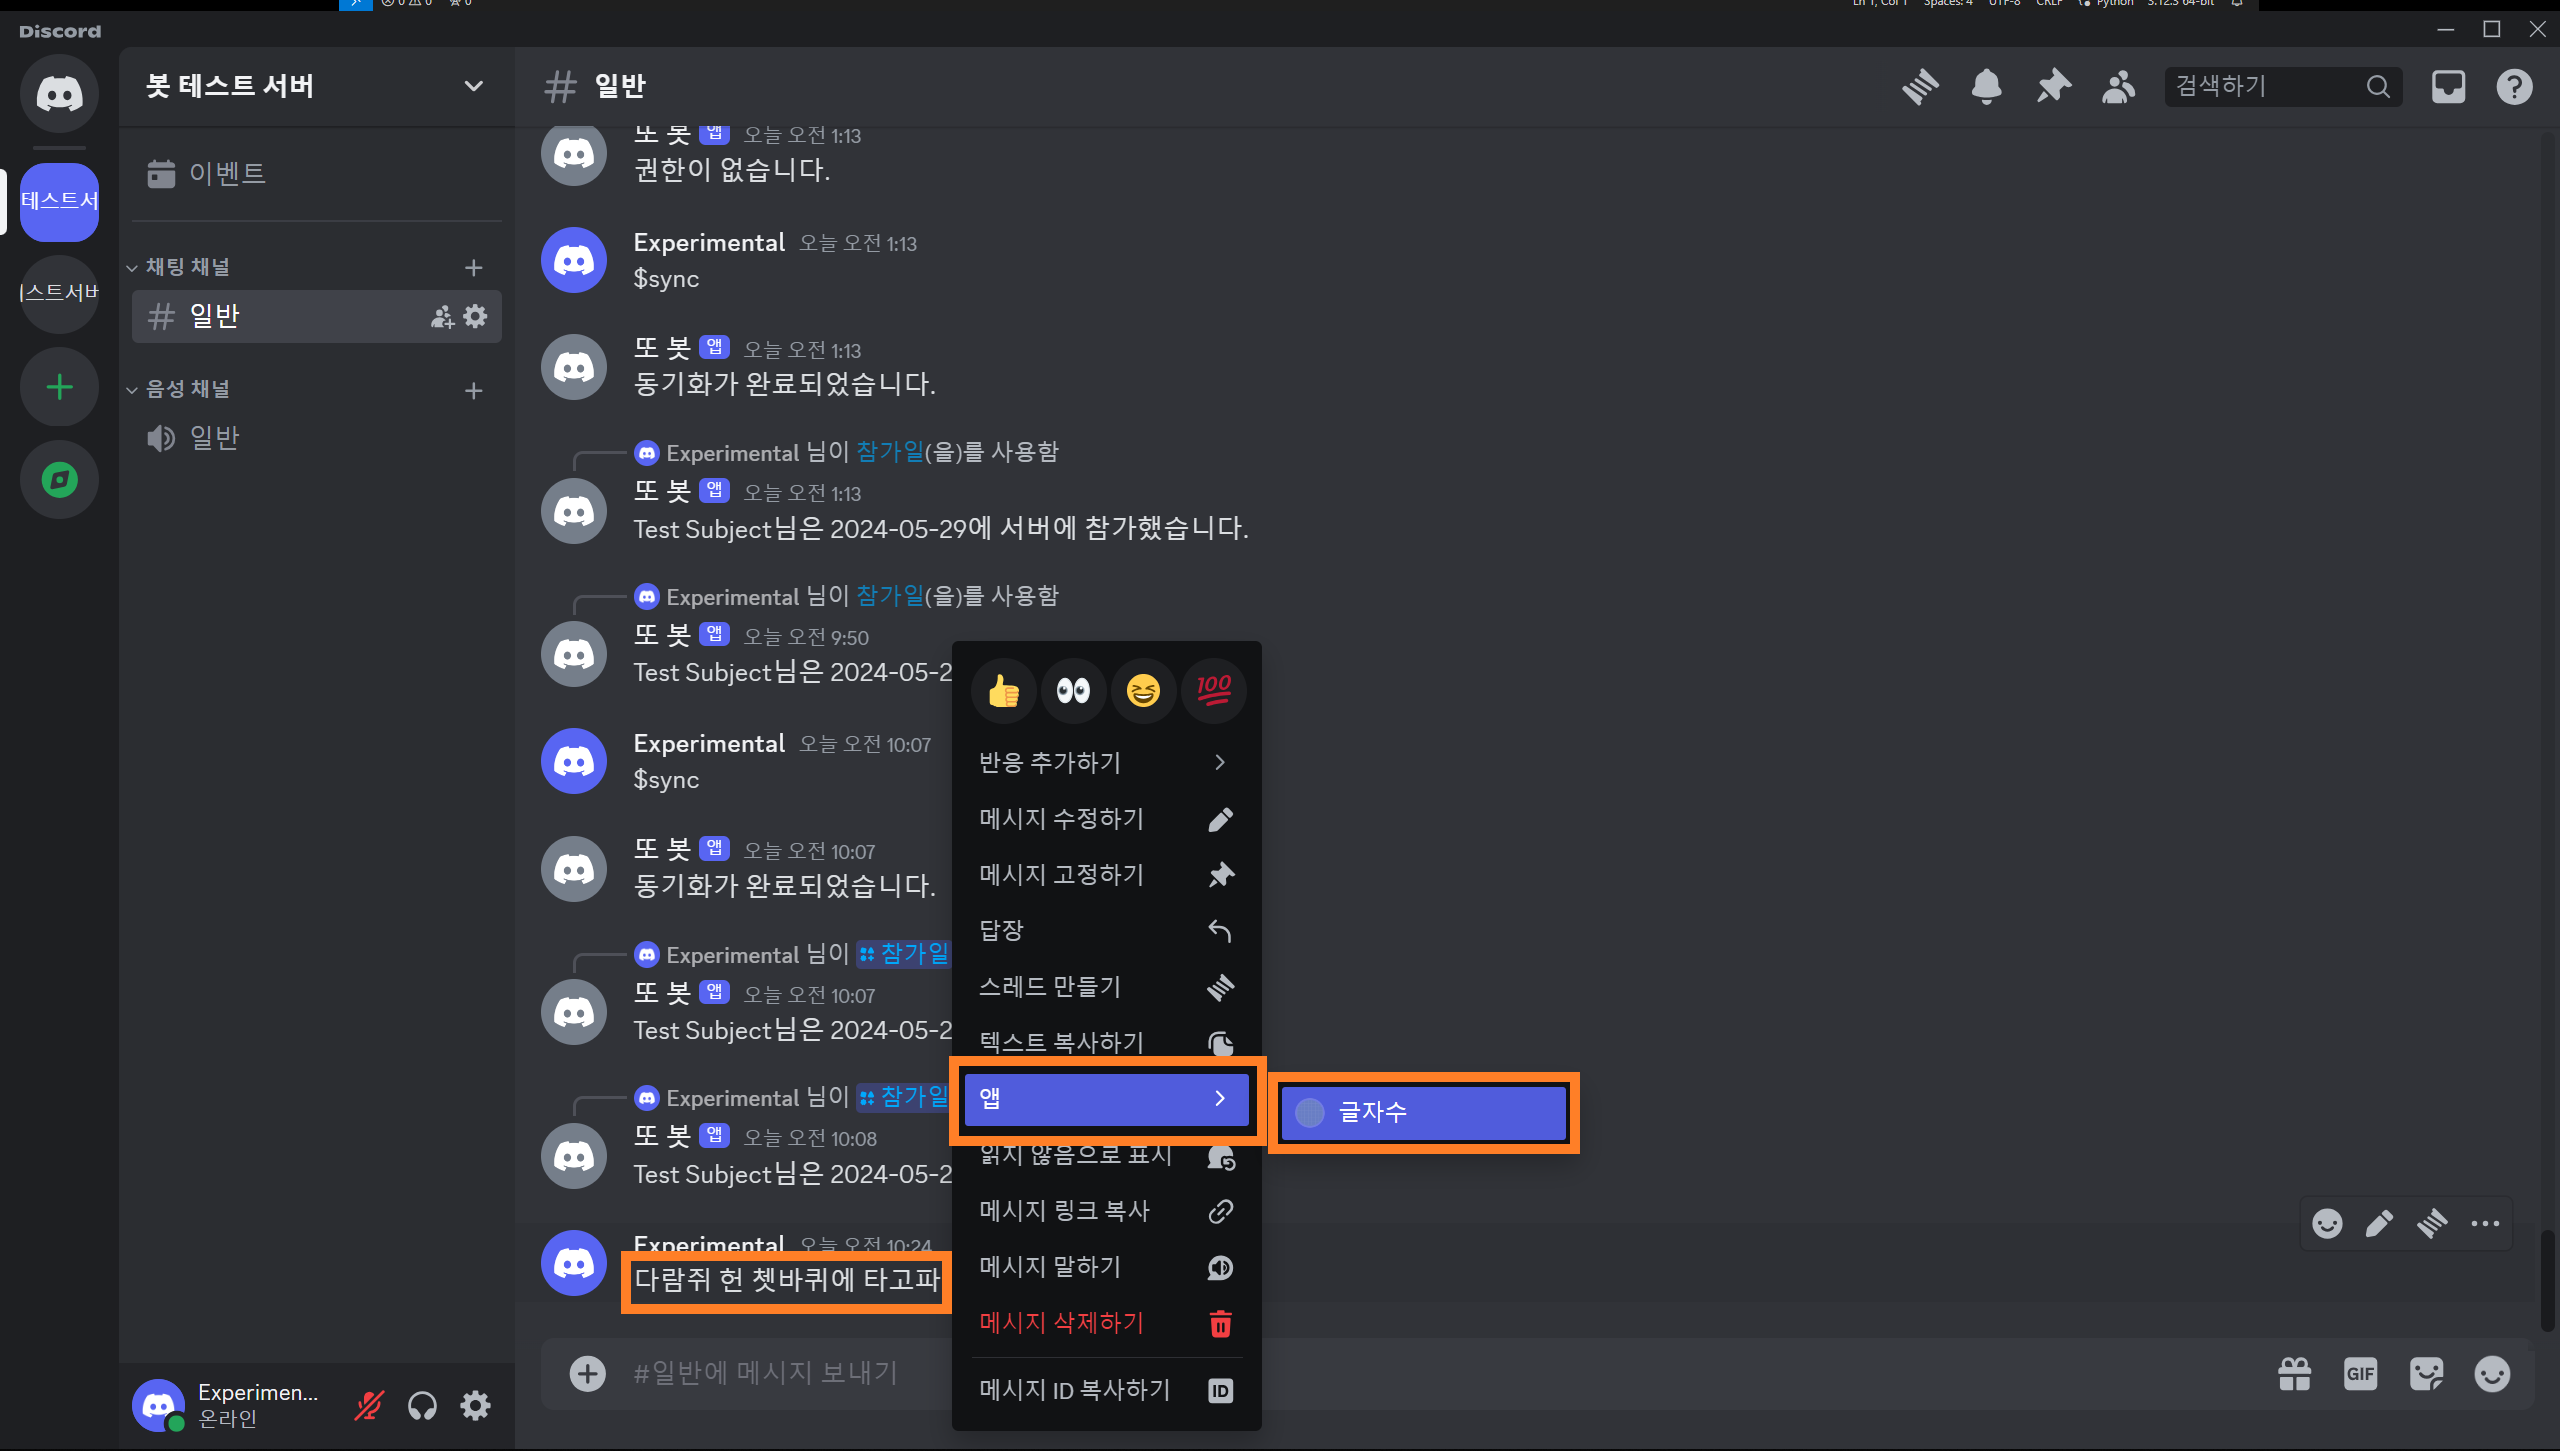
글자 수를 확인할 메시지를 우클릭(모바일에서는 메시지 길게 터치)하고 앱에서 글자 수를 선택해 준다.
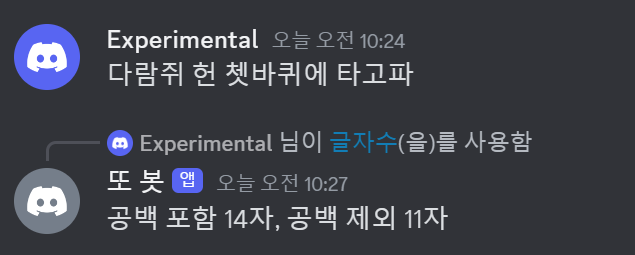
선택한 메시지의 공백 포함 글자 수와 공백 제외 글자 수가 정상적으로 출력됐다.
이렇게 Slash Command와 User Command 및 Message Command 세 가지 Application Command를 모두 구현하는 데 성공했다. 아쉬운 것은 봇이 밋밋하게 텍스트만 출력한다는 점인데, 다음에는 봇의 출력을 더 보기 쉽고 예쁘게 만들기 위해 필요한 UI 요소들을 알아볼 것이다.
부록
i. 전체 코드
코드 보기
1
2
3
4
5
6
7
8
9
10
11
12
13
14
15
16
17
18
19
20
21
22
23
24
25
26
27
28
29
30
31
32
33
34
35
36
37
38
39
40
41
42
43
44
45
46
47
48
49
50
51
52
53
54
55
56
57
58
59
60
61
62
63
64
# bot.py
import os, discord
from discord import app_commands
from discord.ext import commands
from dotenv import load_dotenv

load_dotenv()
TOKEN = os.getenv('BOT_TOKEN')
GUILD = int(os.getenv('GUILD_ID'))
CHANNEL = int(os.getenv('CHANNEL_ID'))
ADMIN = int(os.getenv('ADMIN_ID'))
welcome_channel = {GUILD:CHANNEL} # 길드별 환영 메시지 전송 채널

intents = discord.Intents.all()

bot = commands.Bot(command_prefix='$', intents=intents)

@bot.event
async def on_ready():
    guild = discord.utils.find(lambda g: g.id == GUILD, bot.guilds)
    print(
        f"{bot.user}(으)로 접속했습니다.\n"
        f"접속 길드: {guild.name} (ID: {guild.id})"
    )

@bot.event
async def setup_hook():
    await bot.tree.sync() # tree 동기화

@bot.event
async def on_member_join(member):
    guild_id = welcome_channel.get(member.guild.id, None)
    if guild_id is not None:
        channel = bot.get_channel(guild_id)
        await channel.send(f"{member.display_name}님이 서버에 참가하셨습니다.")

@bot.tree.command(name='hello', description="인사를 합니다")
async def hello(interaction: discord.Interaction):
    await interaction.response.send_message("Hello!")

@bot.tree.command(name='곱하기', description="숫자 두 개를 곱합니다")
@app_commands.describe(정수1="첫 번째 정수", 정수2="두 번째 정수")
async def multiply(interaction: discord.Interaction, 정수1: int, 정수2: int):
    product = 정수1 * 정수2
    await interaction.response.send_message(f"결과는 {product}입니다.")

@bot.tree.command(name='참가일', description="멤버의 서버 참가 날짜를 알려줍니다")
@app_commands.describe(멤버="조회할 멤버")
async def joined(interaction: discord.Interaction, 멤버: discord.Member):
    join_date = 멤버.joined_at.strftime("%Y-%m-%d")
    await interaction.response.send_message(f"{멤버.display_name}님은 {join_date}에 서버에 참가했습니다.")

@bot.tree.context_menu(name="참가일")
async def joined_user_menu(interaction: discord.Interaction, member: discord.Member):
    join_date = member.joined_at.strftime("%Y-%m-%d")
    await interaction.response.send_message(f"{member.display_name}님은 {join_date}에 서버에 참가했습니다.")

@bot.tree.context_menu(name="글자수")
async def character_count(interaction: discord.Interaction, message: discord.Message):
    characters = len(message.content)
    characters_no_space = len(message.content.replace(' ', ''))
    await interaction.response.send_message(f"공백 포함 {characters}자, 공백 제외 {characters_no_space}자")

bot.run(TOKEN)
ii. 폴더 구조
📦Discord Bot
 ┣ 📜.env
 ┗ 📜bot.py