디스코드 봇 DIY - 2. 기본적인 명령어 설정
discord.py 확장 라이브러리로 명령어 설정하기
이 글에서 다루는 내용
Client에서Bot으로 전환하기Command를 활용해 명령어 생성하기- 간단한 error handling 설정하기
Bot과 확장 라이브러리
Bot은 앞서 본 Client의 기능들을 상속받는 일종의 subclass이다. Client만 활용해서 봇을 개발할 수도 있겠지만, Client는 이벤트를 일일이 지정해 줘야 하는 번거로움이 있다. 이와 같은 단점들을 보완하기 위해 discord.py는 확장 라이브러리인 discord.ext(extension)를 포함하고 있다. 이 라이브러리에 Bot이 포함되어 있는데, 편리성을 위해 만들어진 만큼 비교적 간편하게 명령어를 추가할 수 있다.
1. Bot으로 명령어 추가하기
1
2
3
from discord.ext import commands

bot = commands.Bot(command_prefix='!') # 명령어 인식 기호
Bot은 확장 라이브러리에 들어있기 때문에 import discord와 별개로 라이브러리를 추가해 주어야 한다. 그리고 Bot을 초기화할 때는 command_prefix를 지정해야 하는데, 메시지가 여기서 지정된 string으로 시작해야 명령어로 인식된다. 이 경우에는 '!'로 설정되었으므로 느낌표로 시작하는 모든 메시지가 명령어로 인식이 된다.
command_prefix를 여러 개 지정하고 싶다면('!', '?')처럼 지정할 수 있다. 빈 string을 지정할 수도 있는데, 이 경우에는 모든 입력이 명령어로 인식된다.
Command는 명령어로 발동시키는 함수를 나타내는 class다. 일반 함수 앞에 @bot.command decorator를 붙이면 Command 객체가 되는데, command_prefix 뒤에 붙은 명령어가 decorator에서 정한 name과 일치한다면 Command가 발동한다. 예시로 이전에 쓴 코드를 @bot.command를 활용해 바꿔 보겠다.
1
2
3
4
5
6
7
8
9
10
11
12
13
14
15
16
17
18
19
20
21
22
23
24
25
# bot.py
# 수정 전
import os, discord
from dotenv import load_dotenv

load_dotenv()
TOKEN = os.getenv('BOT_TOKEN')

intents = discord.Intents.all()

client = discord.Client(intents=intents)

@client.event
async def on_ready():
    print(f'{client.user}(으)로 접속했습니다.')

@client.event
async def on_message(message):
    if message.author == client.user:
        return

    if message.content.startswith('$hello'):
        await message.channel.send('Hello!')

client.run(TOKEN)
1
2
3
4
5
6
7
8
9
10
11
12
13
14
15
16
17
18
19
20
21
22
# bot.py
# 수정 후
import os, discord
from discord.ext import commands
from dotenv import load_dotenv

load_dotenv()
TOKEN = os.getenv('BOT_TOKEN')

intents = discord.Intents.all()

bot = commands.Bot(command_prefix='$', intents=intents)

@bot.event
async def on_ready():
    print(f'{bot.user}(으)로 접속했습니다.')

@bot.command(name='hello')
async def hello(ctx):
    await ctx.send('Hello!')

bot.run(TOKEN)
두 코드 모두 동일하게 작동한다. 자세히 들여다보면 on_message() 대신에 Command를 활용한 것을 볼 수 있다. Client를 사용할 때는 텍스트로 함수를 호출하기 위해서 on_message()라는 이벤트를 특정해 줘야 했지만, Command를 활용하면 이벤트를 따로 설정할 필요 없이 메시지에서 바로 명령어가 인식되는 모습이다. Decorator에서 name='hello'로 argument를 지정했기 때문에 command_prefix와 name이 합쳐진 $hello를 입력하면 설정된 함수가 호출된다.
ctx는 명령어를 실행한 사람이 누군지와 어떤 채널에서 입력됐는지 등의 Context 정보를 담고 있다.
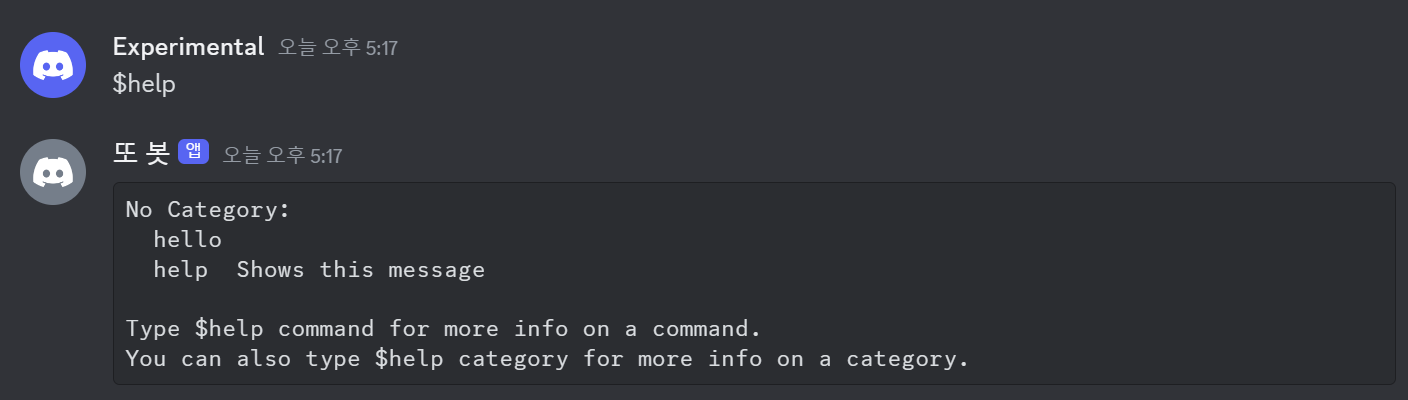
Command를 쓰면 또 좋은 점이 내가 쓴 함수 중 명령어에 해당하는 것이 무엇인지 인지하고 있으며, 따로 추가하지 않아도 help 명령어로 봇에 설정된 명령어들의 목록을 보는 것이 가능하다는 점이다.
1
@bot.command(name='hello', help="인사를 합니다")
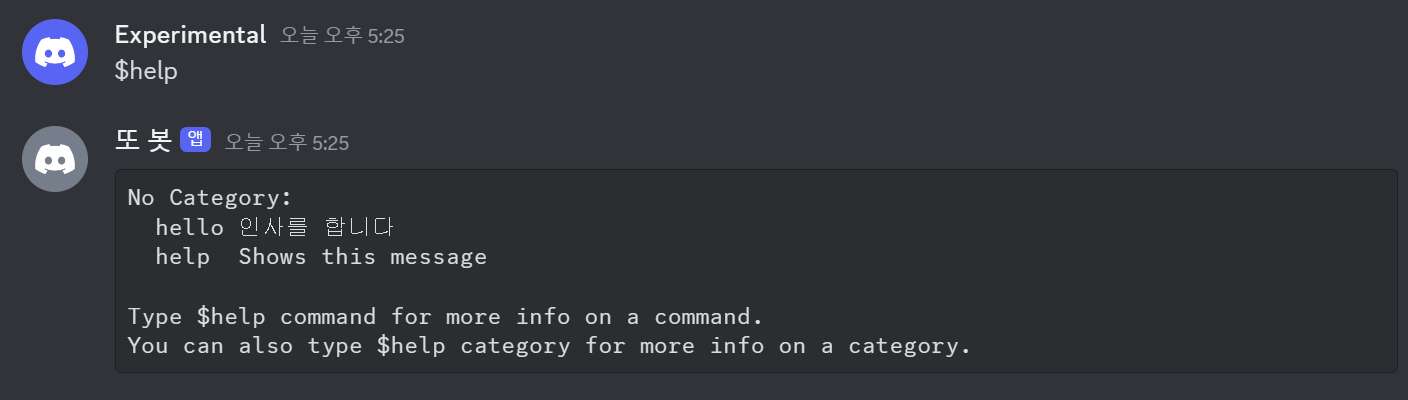
명령어 decorator에 help argument를 추가하면 설명도 달 수 있다. 어떤 명령어들이 있고 무엇을 하는지 사용자에게 보여줄 수 있는 가장 간단한 방법이다. 이런 식으로 Client에는 없는 추가 기능들이 Bot에 자잘하게 있다.
2. 명령어에 Parameter 추가하기
Client로 명령을 받을 때는 전부 string으로 받기 때문에 함수 안에서 type 변환을 해야 했지만, Command를 활용하면 parameter에서 원하는 type을 미리 설정할 수 있다. 아래는 간단한 예시다.
1
2
3
4
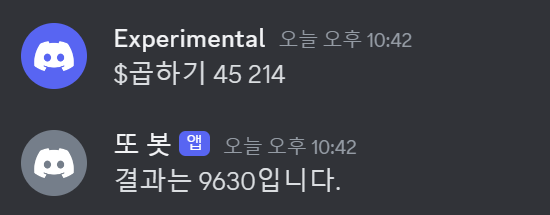
@bot.command(name='곱하기', help="숫자 두 개를 곱합니다")
async def multiply(ctx, first_int: int, second_int: int):
product = first_int * second_int
await ctx.send("결과는 ", product, "입니다.")
first_int와 second_int에 : int를 붙여서 이 parameter들은 정숫값을 받는다고 설정해 두었다. 다만 정수가 아닌 값을 넣지 못하게 막아둘 수는 없어서 error handling은 따로 해야 한다. 더 나아가 parameter에는 단순히 string이나 int 같은 기본적인 type 말고도 길드나 멤버 같은 디스코드 API만의 특수한 type도 들어갈 수 있다.
1
2
3
4
@bot.command(name='참가일', help="멤버의 서버 참가 날짜를 알려줍니다")
async def joined(ctx, member: discord.Member):
    join_date = member.joined_at.strftime("%Y-%m-%d")
    await ctx.send(f"{member.display_name}님은 {join_date}에 서버에 참가했습니다.")
멤버가 길드에 언제 참여했는지를 보여주는 명령어를 만들었다. discord.Member를 type으로 설정함으로써 길드에 참여하고 있는 사용자 객체를 받아들이는 변수로 지정했다. 그렇기에 Member의 attribute 중 하나인 joined_at을 받아와 출력할 수 있다.
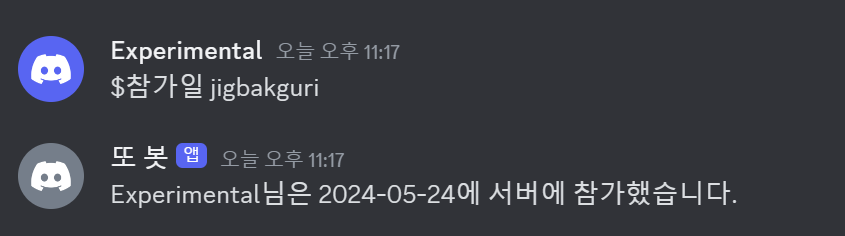
이런 식으로 Member가 현재 길드에 언제 참가했는지 보여준다. 참고로 Member.display_name은 채팅 등 디스코드 인터페이스에 보이는 길드 내 별명, Member.name은 사용자명, Member.id는 변하지 않는 사용자 고유 ID니, 적재적소에 활용할 수 있도록 하자.
3. 명령어 Exception 관리하기
1
2
3
4
@multiply.error
async def multiply_error(ctx, error):
    if isinstance(error, commands.BadArgument):
        await ctx.send("오류: 정수 두 개를 입력해 주세요.")
확장 라이브러리의 장점이 여기 또 있다. Command의 exception을 넘겨받아 따로 error handling을 할 수 있는 건데, 위의 경우 argument가 정해진 type과 다르게 주어질 때 발생하는 BadArgument를 처리하고 있다.
Commands에서 발생할 수 있는 exception 목록은 여기서 확인할 수 있다.
 |  |
정상적으로 정수가 주어졌을 때와 그렇지 않아 exception이 발생했을 때 각각 다른 응답을 하는 것을 볼 수 있다.
이외에도 parameter마다 설명을 추가하거나 생성된 리스트에서 변수를 정하는 식으로 오류를 원천 차단 하는 방법이 있지만 다음에 다른 명령어 시스템을 다룰 때 정리해 보겠다.
부록
i. 전체 코드
코드 보기
1
2
3
4
5
6
7
8
9
10
11
12
13
14
15
16
17
18
19
20
21
22
23
24
25
26
27
28
29
30
31
32
33
34
35
# bot.py
import os, discord
from discord.ext import commands
from dotenv import load_dotenv

load_dotenv()
TOKEN = os.getenv('BOT_TOKEN')

intents = discord.Intents.all()

bot = commands.Bot(command_prefix='$', intents=intents)

@bot.event
async def on_ready():
    print(f'{bot.user}(으)로 접속했습니다.')

@bot.command(name='hello', help="인사를 합니다")
async def hello(ctx):
    await ctx.send("Hello!")

@bot.command(name='곱하기', help="숫자 두 개를 곱합니다")
async def multiply(ctx, first_int: int, second_int: int):
    await ctx.send(f"결과는 {product}입니다.")

@bot.command(name='참가일', help="멤버의 서버 참가 날짜를 알려줍니다")
async def joined(ctx, member: discord.Member):
    join_date = member.joined_at.strftime("%Y-%m-%d")
    await ctx.send(f"{member.display_name}님은 {join_date}에 서버에 참가했습니다.")

@multiply.error
async def multiply_error(ctx, error):
    if isinstance(error, commands.BadArgument):
        await ctx.send("오류: 정수 두 개를 입력해 주세요.")

bot.run(TOKEN)
ii. 폴더 구조
📦Discord Bot
 ┣ 📜.env
 ┗ 📜bot.py